Quick(ish)start
Welcome to the Intiface Central Quickstart guide! This will get you up and running with Intiface Central (part of the Buttplug.io stack for users) with hopefully little work.
Either that or it'll just make you so angry that you never use our software again.
Who is this guide for?
Anyone who has an app/game they want to use that says it uses "Intiface" or "Buttplug"! This guide teaches you how to use our Intiface Central application to manage and connect to your hardware, which will then let those apps/games control the hardware!
This quickstart guide is for the portion of the Buttplug library stack that will mostly be seen by users. While there is no code in this documentation, if you're a developer we still highly recommend going through this before working with the Buttplug library itself, as the users of the projects you create with Buttplug will most likely use Intiface Central to connect your project to their hardware.
Once you've gone through this quickstart, we recommend reading the Buttplug Developer Guide to learn how to build apps/games with Buttplug that will use Intiface.
What is Intiface Central? Why do I need it?
You may have seen some games or apps that say they have "Buttplug (or Buttplug.io) Compatibility", or that you need Intiface Central (hereby referred to as IC) for something like video sync software to work with your toy. If so, you're in the right place!
IC is an application that allows you to connect your sex toy hardware to your computer or mobile phone, as well as test toy functionality and configure it as you'd like. After you've gotten IC up and running, you can then have other applications connect to it to control your toys.
Having a hub application like IC handle hardware connections means that the Buttplug/Intiface Team can provide functionality/security updates as needed, without requiring that everyone building applications also update their software. We also do our best to provide backward compatibility, meaning old applications may work with hardware released long after they stopped being developed!
The goal of IC is to deal with set up once, then stay mostly out of the way. There is a good chance this quickstart section may be all you need to read of this manual.
For the developers and/or nerds in the crowd, here's a quick rundown of what's actually going on in Intiface Central.
Intiface Central is a GUI wrapper around Intiface Engine, which itself is a CLI wrapper around the Buttplug Server. Buttplug Server is the portion of the core Buttplug library that handles communicating with hardware and managing client connection sessions and control, while Buttplug Client is what Applications implement to talk to Buttplug Server. Both Intiface Central and Engine provide UI to start and stop the server, as well as configure it to work with certain types of hardware connections, load user configurations, etc...
As this manual is meant for all users, we'll be keeping this section short for now. For more information on system architecture, we recommend checking out the Buttplug Developer Guide.
If Something Goes Wrong During Setup
If you run into issues while going through the quickstart, there's a few places you can either find information or ask for help:
- The Buttplug/Intiface Forums
- The Buttplug/Intiface Discord Server
- The Troubleshooting Section of This Guide
Getting Intiface Central
One of the most important steps of setting up Intiface Central is actually getting it installed first.
Desktop: You can download the latest version of the software from the Intiface Central Website.
Mobile: Intiface Central is available on both the Google Play Store and Apple App Store.
Your first Intiface Central Session
On your first session, we'll go over the core usages of IC:
- Setting up the software to connect to your hardware.
- Starting and stopping the Engine
- Connect and test devices with Intiface Central
- Connect to an outside application, which in this case will be this manual!
Starting and Setting Up Intiface Central
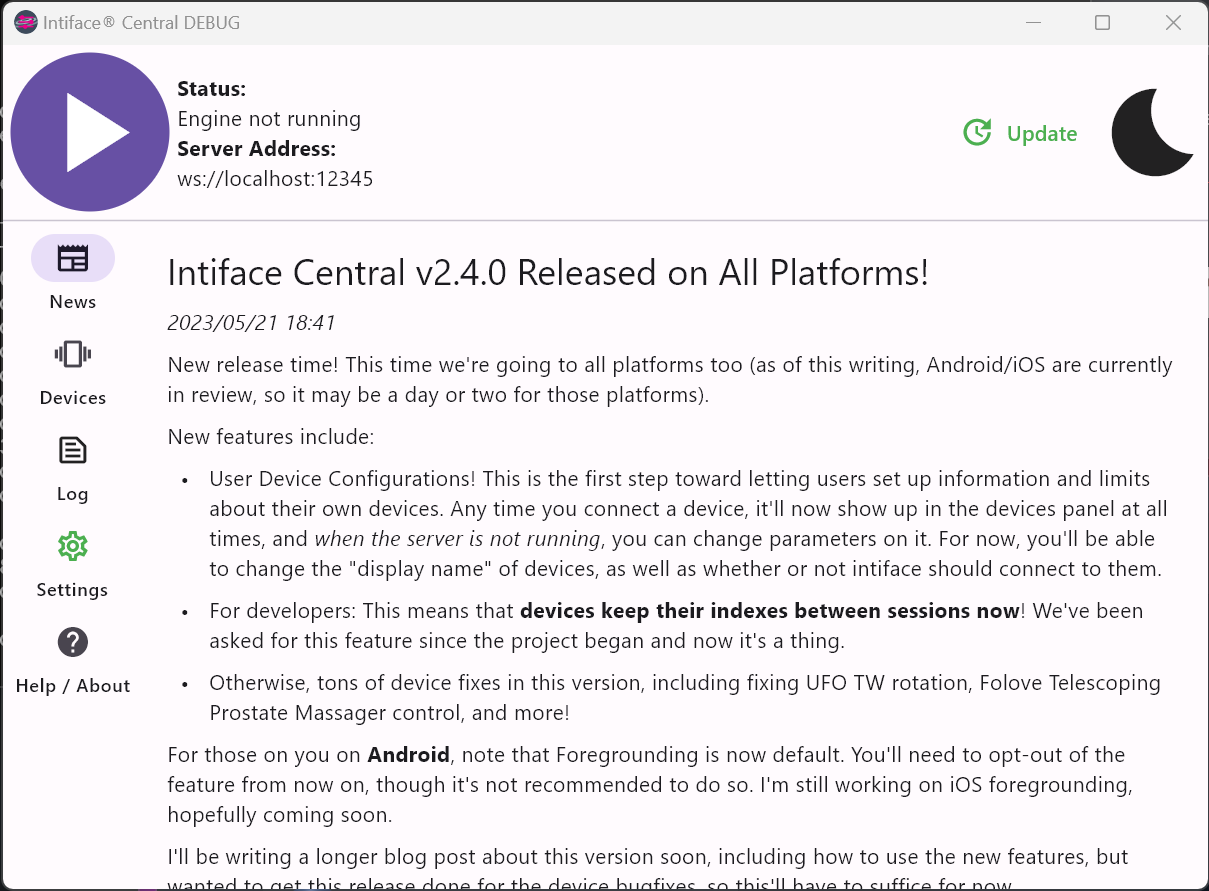
When you first start up Intiface Central, you'll see something similar to this screen:

The first thing we'll want to do is set up the application so we can find the devices we care about.
Application Setup
Device Setup
Anyone that bought their toys from a place like Lovense, Kiiroo, WeVibe, etc... continue on, this warning is not for you.
For anyone reading this that's planning on using IC with a DIY device: note that we're keeping things simple for this tutorial because 98% of our users just want to connect their simple commercial vibrator to the app. Adding devices that require special configuration, like the OSR-2, SR-6, or other devices that work through websockets or Serial Ports will not be covered here. That said, we recommend reading the portions of the Hardware section related to your connection type, which will give you more information on how to configure these devices.
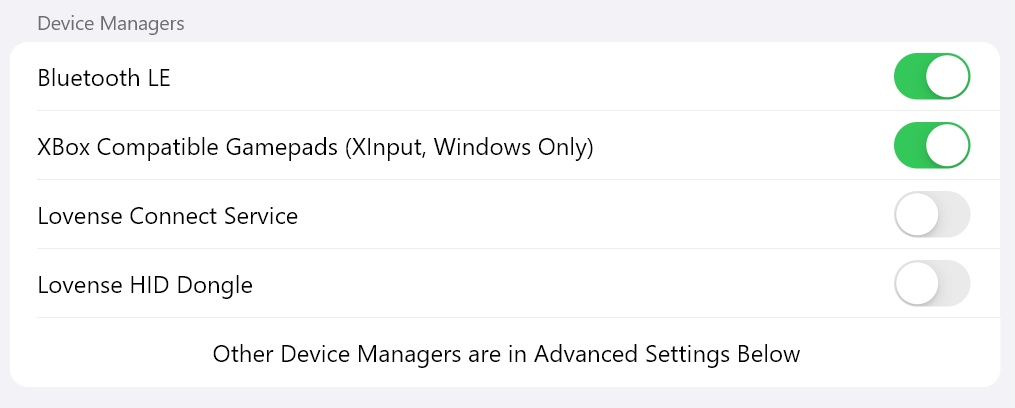
Click on the App Modes options on the side window, and scroll down until you see the Device Managers section.

We'll want to turn a few of these on/off, depending on your toy setup.
- Bluetooth LE
- THIS IS THE PREFERRED METHOD OF CONNECTION FOR ALL TOYS. YES, EVEN LOVENSE. IT IS ON BY DEFAULT.
- Most of the toys Buttplug supports are Bluetooth LE. We can use a bluetooth radio, like a USB dongle or the one built into your phone, to communicate with and control the toys.
- With the exception of a few brands of devices, you should NOT pair/connect the device in the OS Bluetooth settings (this will either prevent the device from being discovered or will result in a
NotConnectederror).- Brand specific instructions for WeVibe/Satisfyer/Kiiroo can be found in the Brands section.
- XBox Compatible Gamepad
- Gamepads aren't particularly sexy, but they are the vibrator most people have. We support gamepad rumble for testing output from programs, both for development and for people who just want to see what feedback will happen from a Buttplug compatible app/game without necessarily having to buy a sex toy first.
- Lovense Connect Mobile App
- For users with a Lovense toy that don't have a Bluetooth Radio in their computer or device, the Lovense Connect Mobile App can be used. Note that this is finnicky and incredibly difficult to debug if it doesn't work, as well as being slower than bluetooth. Try Bluetooth LE first, and if that doesn't work, this is an option.
- Lovense USB (HID) Dongle
- THE LOVENSE DONGLE IS NOT REQUIRED TO USE LOVENSE TOYS WITH BUTTPLUG, NOR DO WE RECOMMEND USING IT.
- For users with a Lovense toy that don't have a Bluetooth Radio in their computer or device, the Lovense USB HID Dongle can be used. Note that the dongle is MUCH slower than direct Bluetooth LE and only connects to one device at a time in IC.
- If the Lovense Dongle is used, Bluetooth LE will turn off, as the Bluetooth Radio and Lovense Dongle will fight each other over toy connections if they are both on at the same time.
There are other Device Manager choices available in the Advanced section of the settings panel, but they are not covered as part of this quickstart.
Once you've got your device managers set up, it's time to start the engine and test your devices!
Starting the Engine
Now, let's take a look at the persistent bar at the top of the app, the Engine Control Panel.
Intiface Engine is the fancy name for the portion of the app that handles connecting to/controlling devices as well as listening to games/apps to connect. When you start the app, it's normally off, though you can change it to start automatically in settings.
The Engine Control Panel gives you information about the IC application as well as the engine.

The control panel consists of a few different areas. Going from left-to-right:
- The big Play button is the Engine Start/Stop button. Hitting this button will start the application listening for Apps and Games to connect, as well as allow you to use the Devices Panel to find/control devices within IC.
- The text next to the button relays information about the Engine. Since we just started the app in the picture of above, the engine is not currently running.
- The Server Address is provided as it sometimes need to be entered into apps/games for connection purposes. In this image, it's set to the default, and most apps/games will try to use this address by default without you having to enter anything.
- On the right, there is a large icon that just signifies the status of the server, similar to the status text in the prior portion of the panel. It's handy if you need to see the status of the program at a quick glance. Currently, it's set to a sleep symbol, meaning the server is down.
Let's go ahead and hit start.

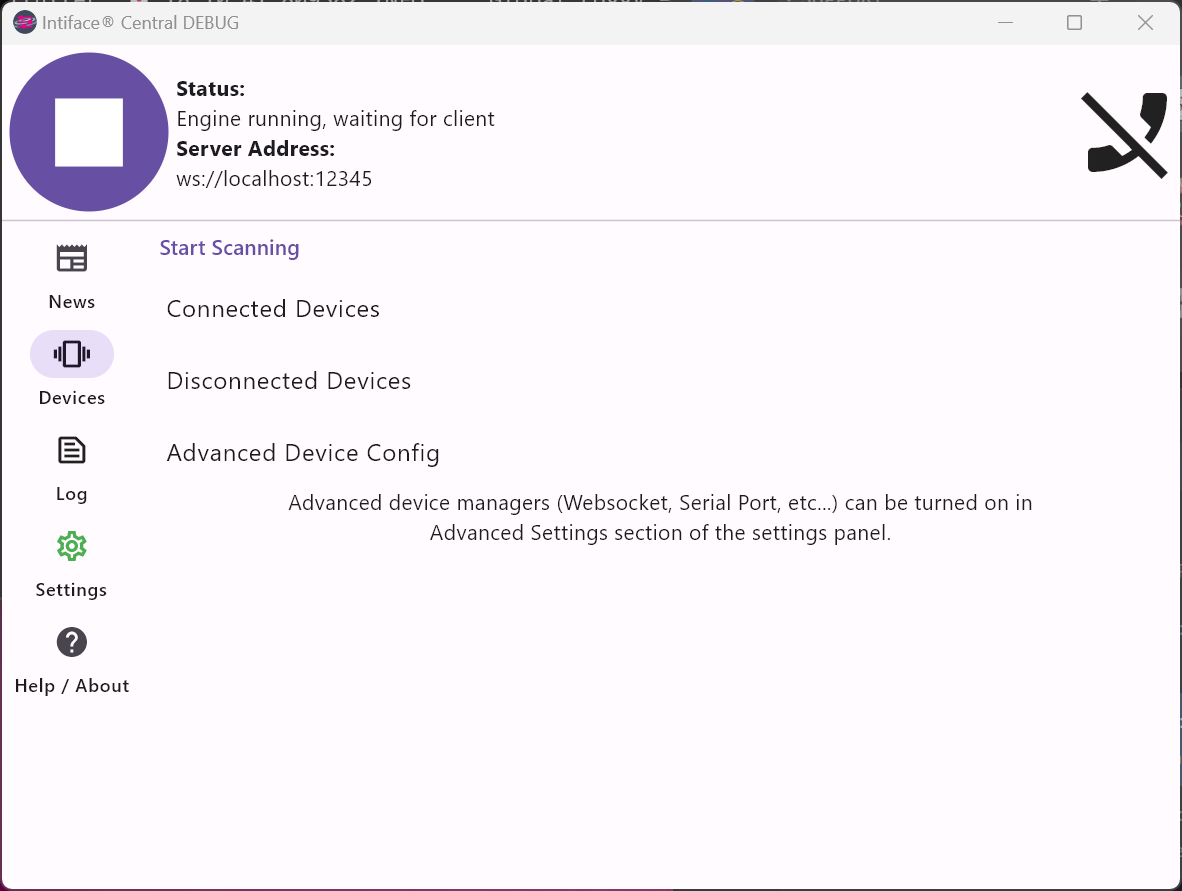
As you can see, there's been a few changes to the engine control panel:
- The Play button is now a stop button. Hitting the stop button will stop the Engine, which disconnects all app/game connections and stops and disconnects all hardware devices.
- The status now reads "Engine running, waiting for client"
- The icon on the right is now a "disconnected" icon, meaning the Engine is waiting for a connection but does not currently have one.
The engine is up and running! Great! But before we move on to devices, let's go over a couple of other lesser-used but still important features of the control panel.

In some instances, a couple of extra buttons can appear on the control panel.
- Update
- IC updates quite often, so if you see Update, it means we've released a new version. Clicking on this will take you to the settings panel where there is a link to download the new version.
- Error
- If something goes wrong with IC (and it does quite often, bluetooth is hard :c ), we'll print an error message to the log panel about what went wrong. The error button will appear in the control panel, and clicking it will take you to the error in the log panel. This is handy if you need to share information with our support forum or discord.
Now that you know your way around the control panel, let's try connecting some devices!
Connecting Devices
IC allows connecting devices as long as the Engine is running, even with an application or game isn't connected currently. This allows you to make sure everything is up and running with your device before getting other programs involved.
For this section, we'll be testing with an XBox Controller and a Lovense Max 2, so the information shown on the screens here may differ from yours. As long as IC sees your devices, we're good.
To start, let's start the Engine and go to the Devices tab. Your IC app should look similar to this.

No devices are connected yet. Let's change that! Hit the Start Scanning button at the top of the panel.

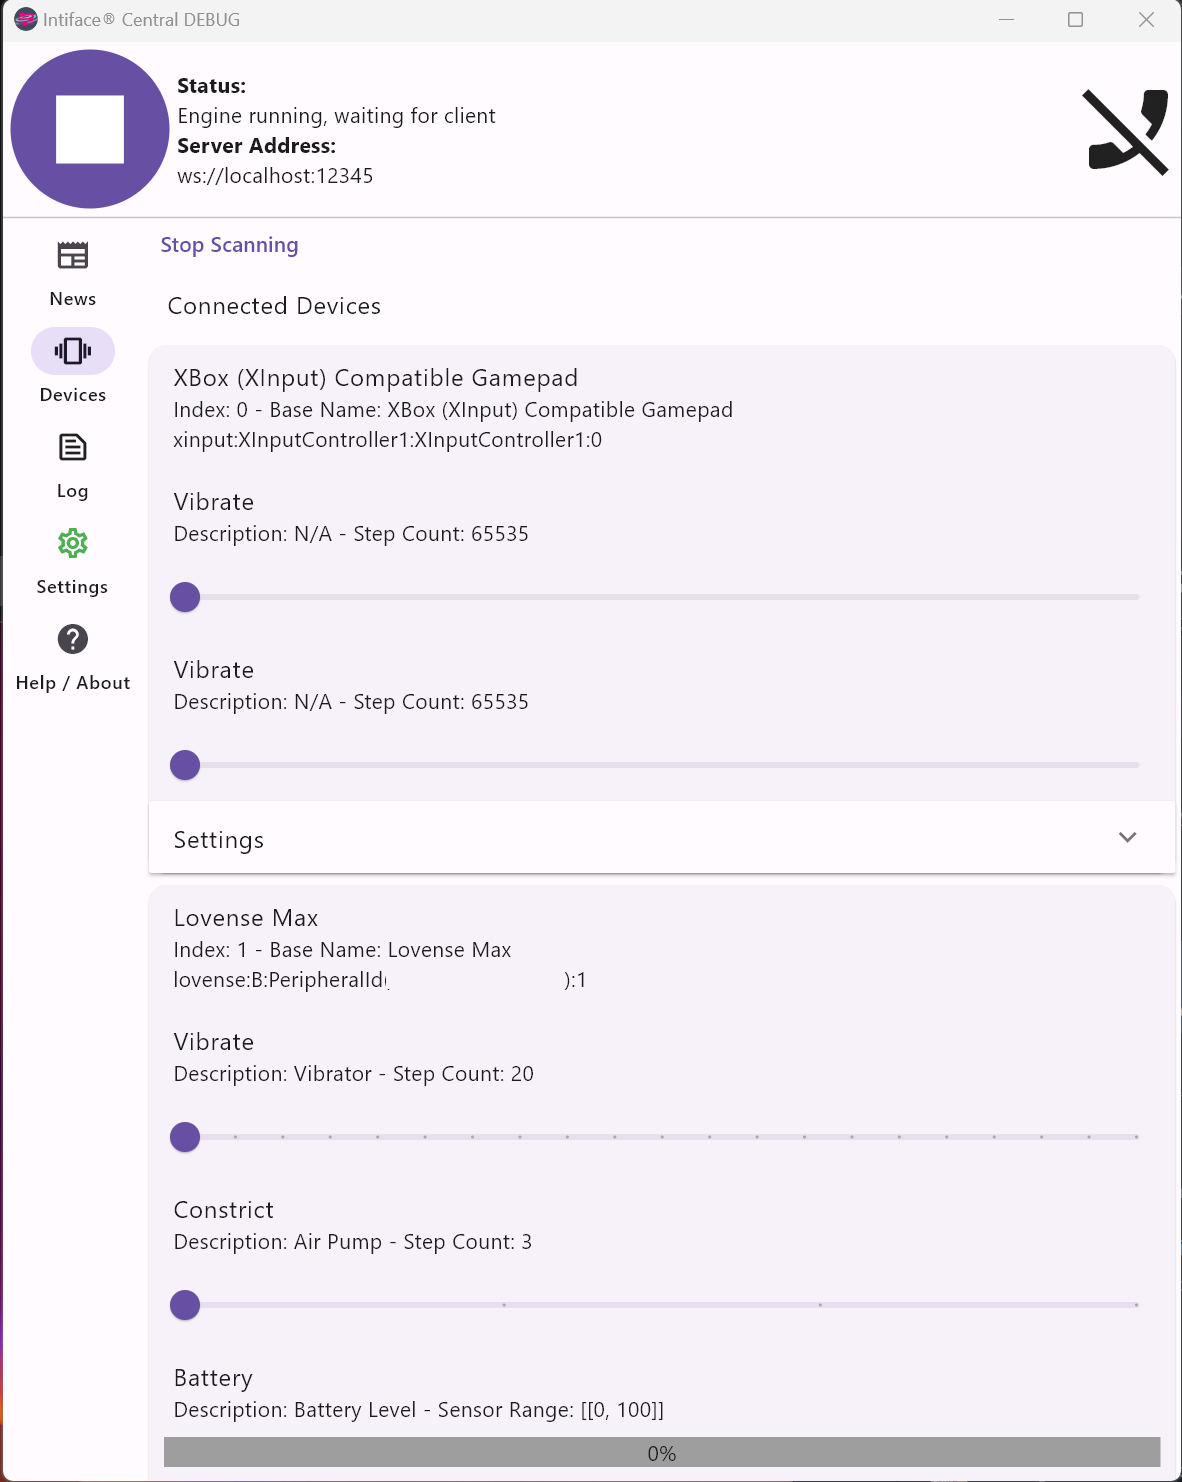
IC found our XBox Controller and Lovense Max 2 toy! It also presents us with sliders in order to control the functions of the toys, including both vibrators of the gamepad, and the vibrator, air pump of the Max. We can also check the battery level of the Max if we want!
You can now hit Stop Scanning so that the system will stop looking for more devices.
Connecting Your First Application
On to the final part of our not-very-quick quickstart: Connecting an application!
For that, we'll connect... this quickstart guide! We've actually built a full Intiface testing application right into the guide.
This will mimic how you'll connect applications and games to Intiface Central.
To run this test application:
- Start Intiface Central
- Start the Engine
- Hit the Connect button below
- You should see the status update on this page, as well the client name change in Intiface Central
- You can scan for devices by either hitting the button that appears after connection on this application, or using the method we described earlier using the Devices Panel of IC. As devices are found, they'll show up in a list below
- You'll be able to test control devices based on their properties.
- Once you're done, you can hit Disconnect below, stop the Engine in IC, or else just move on to another webpage.
Intiface Central Test App
What To Do From Here
If you've made it this far with no errors showing up in the program, you're ready to use Intiface Central! The rest of the documentation goes over the UI in-depth, as well as advanced usages of IC, more information about different hardware connections, problems that are common with different brands of toys, and how to troubleshoot or get help if you run into issues.
If you're interested in any of that, please continue on, otherwise, enjoy Intiface Central!